

What you need to know for your first major inspection on your new home
Follow me as I walk through this under-construction Lennar home
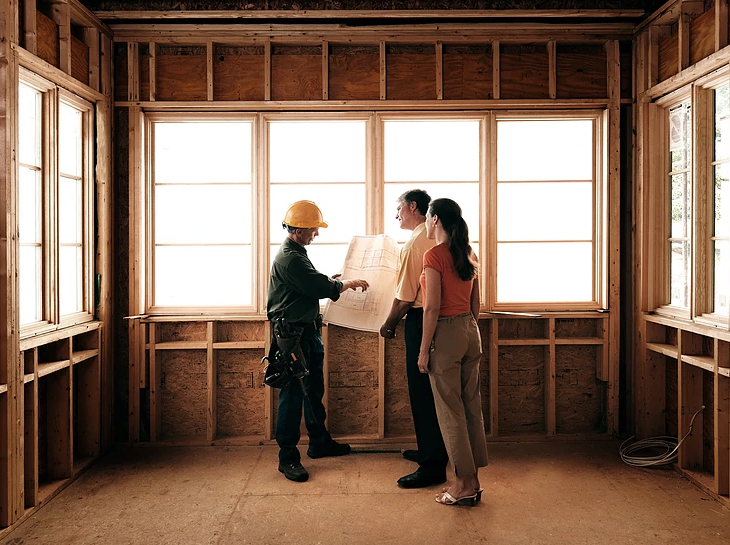
If you’re building a home, your first opportunity to do a formal walk-through will likely be right before your builder installs drywall. Framing, HVAC, electrical wires, outlets, plumbing, can lights, A/V lines, and any other selections/upgrades you picked that need to go behind your walls should already be installed – and visible – in your home at this point.
But not for long!
Once the drywall goes up, you won’t have visibility into electrical wires, pipes, and other internal systems. Also, post-drywall it’s much more difficult to install behind-the-wall selections/upgrades, like fireplaces. So what builders often call your “pre-drywall walk” is an important step in the home construction process as it’s your last opportunity to inspect what’s behind your walls.
What’s a pre-drywall walk?
During a typical pre-drywall walk for most of Stapleton’s builders, such as Thrive, Infinity, Parkwood, Wonderland, KB, David Weekley, Creekstone, and Lennar, you’ll spend 1-3 hours touring your home with your construction manager in order to get acquainted with, and ensure the proper installation of, wires, plumbing, internal systems, and any selections/upgrades you picked when you signed your builder contract, or after. (Want to know more about builder contracts? Check out this Scoop article: 7 things to know about new home builder contracts.)
And now, onto my 4 best tips for pre-drywall inspections!
(1) Document, document document!
First and perhaps most important is to take as many pictures and as much video as you can during your inspection. Want to hang a picture in the future, but don’t know what’s behind the wall you want to use? What if you want to do home renovations years from now? You’ll thank yourself down the line for documenting your home at the pre-drywall stage.
If you can, I strongly recommend doing a 3D Matterport model of your home as well. This allows you to spend more time focusing on the inspection itself, and less time on pictures/video. Also, having a 3D rendering of your pre-drywall home is much easier to work with than trying to string together 100 pictures or 30 minutes of video. Last but not least, I’ve found that people love to share their 3D models with friends and family so they can see what’s going on with the home!
As two examples of 3D Matterport tours at the pre-drywall stage, here’s a 3D tour of the same Lennar that’s in the video above, as well as a lovely Parkwood in Stapleton’s Beeler Park:
(2) Peace of mind … for only $200
Although not required, I recommend that you hire a professional inspector to inspect your home at the pre-drywall stage. Your inspector will give you a detailed report documenting any and all issues he or she discovers – which means you don’t have to play professional inspector during your pre-drywall walk.
In my experience, most pre-drywall inspection reports come back with few or no issues, but when an inspector does uncover an issue, they tend to be big issues. I’ve seen accidental cuts in joists, potential drainage/grading issues, and more.
Also, if your inspector does uncover an issue, sometimes the issue was already on the builder’s radar, in the process of being fixed, or would fall under your new home warranty. Regardless, I still think it’s helpful to hire a second set of professional eyes, especially given the cost ($175-$250 for a pre-drywall inspection in Denver right now).
(3) The more electrical outlets and can lights, the better

We live in a world of devices. I’m writing this article while sitting in my home office in Conservatory Green, and I have 4 different devices plugged in around me – 2 laptops, a cell phone, and an iPad. Even though I built my own home less than two years ago, I still regret not adding more outlets!
Some builders won’t let you add more outlets, but if your builder does, pay attention to the location of each outlet during your pre-drywall inspection and think about how you might end up using each particular room when your house is done. If you’re hesitating about whether you should add another outlet or not, add it! The extra cost is often only a few hundred dollars per outlet (approx. $150 – $300), which is significantly cheaper than adding outlets after your home is complete.
Similarly, each extra can light (the recessed lights in your ceilings) only costs a few hundred dollars (approx. $200-$350), but saves you from having to buy extra lamps and lights after the fact if you think a particular room is too dark. I personally love bright, light-filled rooms, so I’m always a fan of adding extra lights if you’re not thrilled with the location/potential lighting of a room during your pre-drywall walk. Again, not all builders will allow you to add more lights, but it’s worth asking.
(If you’d like to learn more about new home and upgrade pricing beyond outlet and can light pricing, check out this post: What will a new construction home really cost you?)
(4) The more questions you ask, the better!

When you buy a resale home, you often have little to no idea what’s actually behind the walls of your home. Sure, you had a home inspector go through the home pre-closing, but home inspectors are limited by what they can see, and inspectors don’t usually poke holes in walls to see what’s lurking behind.
Compare this to a new home. Regardless of which builder you selected, there’s a lot to learn about what’s inside your new home. Your pre-drywall walk is a wonderful opportunity to get your ‘mini-masters’ on home construction. Having attended many pre-drywall walks myself, I’ll be the first to tell you that it’s amazing what you learn about ductwork, air registers, plumbing cleanouts, window flashing, electrical panels, and more during pre-drywall walks.
In short, use your pre-drywall walk to ask questions and learn the ins and outs of your home and its internal systems!
So those are my top 4 tips for pre-drywall inspections. If you have any questions, I’d be happy to help! E-mail me any time at Mariel@Focus-Realtors.com.


2 Comments
Sunny Freedman
Hi Mariel,
I am building a house in Utah with Sego homes, and soon will be time for the pre-dry wall inspections. I want to get an inspector, but I have no idea what kind of an inspector to search for on Google? Do they have a specific title? Or where to even look for one?
Thanks,
SUnny
Comments are closed.